Peg Looms
"Be prepared to play"
- this is what I always say to customers on the stand at a show. Weaving is a totally absorbing and fun activity. To begin with, play and experiment, get used to the feel of the yarn and how you and it interact. Weaving tension is something which may require some work. Tighter tension and the weave will be perhaps narrower and denser than you hoped once off the loom. Too loose a tension and the final result may be too open and floppy. For Peg Looms try the same weave with the same yarn on the different peg rows to see how the spacing effects the weave. It's that and not the peg diameter makes all the difference. The basic rule is narrow peg spacing use thinner yarn and wider peg spacing increase yarn thickness accordingly.
Technical: First check the fit of the pegs in the holes. No need to force them in as they need to free enough to pull out easily when you slide the weave down the warp. Different timbers have different characteristics and some will grip the pegs tighter than others to begin with. With use both pegs and holes will adjust. Initially a little wax polish applied to the bottom tip of the peg and then the peg rotated in the hole may help. Much better to allow a snug fit to develop naturally than have oversized holes and sloppy pegs.
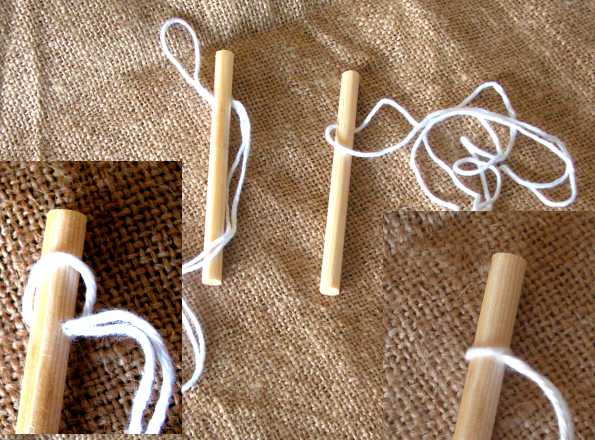
Terms: Warp refers to the up and down threads on which the weave is created on a peg loom or any other loom. Weft refers to the side to side weaving strands. The warp may be a strong cotton as shown in the picture or of the same material you're using to weave with.
Warping the pegs: This can be done in 2 ways.
1: Thread a single strand of the warp through each peg in turn and back down to the other end of the warp. The length of the warp is dictated by the length of the piece you will be making. Make the warp up to as much as twice the length of the finished piece for tying off and finishing later.
2: Fold the warp in half and pass the loop through the peg. Then pass the loop over the top of the peg and pull the loose ends down to tighten up the loop. This method works really well if you are going to insert beads into the weave as the warp can be taken off the peg, a bead threaded on and then the peg re-attached.
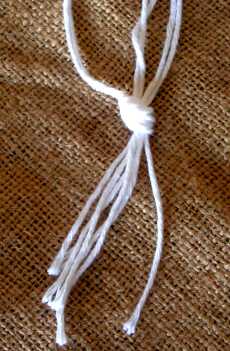
Insert the pegs into the peg loom base. Use multiples of 3 as this makes it easier to tie off. Tie off the dangling warp ends loosely - these will have to be undone and re-tied when finishing off the weave. Having an odd number of pegs also provides a true centre to the weave which is helpful when creating some patterns.


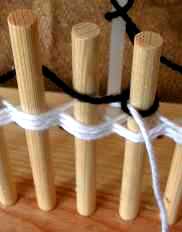
Starting the weave: Take the wool or other material to be woven and tie it with a half hitch knot to the outermost peg on the peg loom (left or right depending on which you find easiest) simply to secure it.
Leave a few inched of wool as a tail strand to secure and weave in later. Now start weaving in and out of each peg from one end of the row of pegs to the other. At the end of each row make sure the woven thread is pushed down to the bottom of the peg and give it a little tug simply to eliminate any slack in the weave. Go around the last peg and back again tensioning the weave every time the last peg is reached.
To change colours: Try and avoid knotting 2 together as the knot may be seen in the finished weave. Better leave a long tail (6" or longer) on the previous strand and start the new one the same way.

A half hitch can be used to secure either the old or new thread ensuring the end of the other thread is also secured through the knot. Alternatively cross the ends over together (leaving long tails one in front and one behind) and carry on weaving. After a couple of rows give the loose tails a little tug simply to re-tension that part of the weave.
Continue weaving up the pegs to about 2/3rds their height. Now there is a good even weave on the pegs and enough exposed peg to grip. You can finish the last row before lifting the pegs either at the end of the weave or in the middle. I prefer to finish in the middle as it's obvious which side of the peg you'll be starting the new section on.
Take hold of the first peg and pull upwards with a slight rotation if still a little firm. Try and avoid rocking the peg backwards and forwards too much as it could a) enlarge the hole too much and b) eventually snap the peg.
In lifting the peg, it has now drawn the 1st strand of the warp upwards into the weave. Replace each peg in turn back in the board. Repeat this process for all pegs. The weave is now in front of the peg loom with the wool you are working with all set to carry on.
If there's some slack warp between the top of the weaving and the bottom of the pegs hold the weave with one hand, and the end of the warp with the other, and tug the warp. This will take up any slack in the warp and keep the weave tighter at the joints when finished. Do this for all the warp strands.
If you finished the last row at the end, it's worth doing a quick check before setting off weaving again just to see if the last peg was woven on the back or the front side. Setting off again on the same side as the last row may leave a noticeable line across the weave. It's not detrimental, and can sometimes be used to good effect. However in a large area of the same colour it will look inconsistent unless the intention is to repeat it as part of a pattern.
When you have completed the weave, lift all the pegs from the board so you have as much warp at the top of the piece as below. Cut or unhook the warp from the pegs. The warp will now be in strands of 2. At the bottom of the piece, you can either tie the first two strands to the second two, or the first two to one of the second two, the remaining second strand to one of the third ones and so on till tying off is complete. Tie off right at the bottom of the woven piece leaving the long strands still showing.
With a long needle or "strand threader" (we make these to) thread thread each strand back up inside the weave. Leave the strands long and poking out of the weave for the moment. When all strands are threaded up this way, give each group a little tug so the tying off knot at the bottom is "just" drawn into the weave. Then trim off all the loose ends which are still showing so they can then disappear back into the weave.
Before doing the top edge, lay out the weave to make sure it looks tight and even. It will probably look out of square, this isn't a problem and can be sorted out later. If the weave looks a little loose, just hold the top strands and slide the weave down a little bit. This can be done uniformly by laying the strands "between" the pegs on the loom with the weave touching the front of the pegs, and giving them a little tug. When satisfied with the look of the weave, tie off and hide the strands as above.
The top and bottom of the weave can now tidied up by adding tassels, a crochet border or stitching over with the same or different wool as used in the weave.
