Square Pin Looms
Surprisingly the square pin loom offers 4 basic warping options plus the opportunity for a continuous weave as with a Tri Loom.
Warps 1 and 2 are the simplest warps being up and down the loom from 1 pin to another.
It's worth mentioning that the weave will look quite open while on the loom, but once the edges are locked and the weave lifted it will close up and the gaps disappear.
Warp 1 - approximately an 8mm weave using a DK yarn (even though the pins are 10mm apart) - less if using a Chunky yarn.
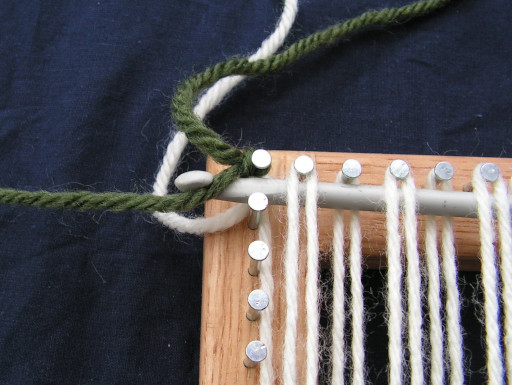
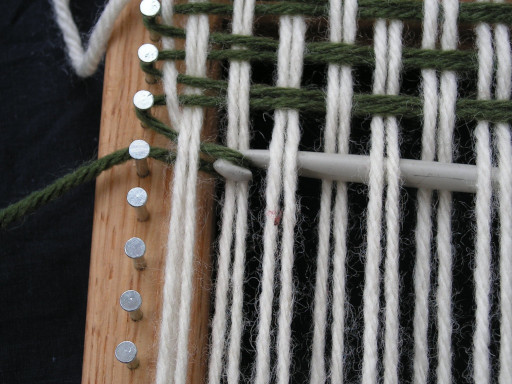
a) With the loom square on, tie a slip knot in the yarn and loop over the top left pin. Pull the knot tight. From there take the yarn down to the bottom left pin (running the yarn inside the left side vertical row), go around it and back up to the 2nd pin on the top row. From there just go up and down the loom till all top and bottom pins are used. The loom is now fully warped.


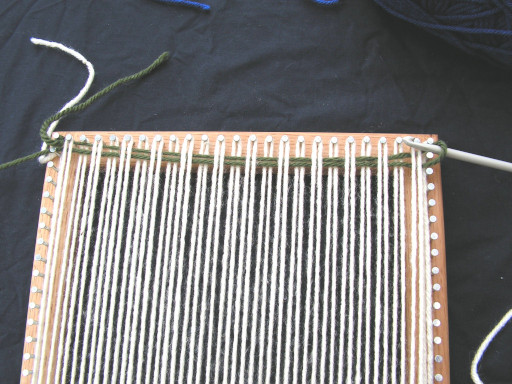
b)The weft is the horizontal weave. To start weaving across the warp go back to top left pin 1 again and tie on perhaps a different coloured yarn.
I use a crochet hook for the weft inserted from the right of the loom, over and under 2 warps at a time to draw it across the loom. You may prefer or find it quicker to use a long needle with a large eye instead to take the weft through the warp feeding from left to right.
Repeat the above till all pins have been used


c) To change colour at any stage. Leave the previous colour attached and simply bring in the new colour maybe weaving a couple of rows with it to secure it in the weave.


There will be a tail sticking out of the weave where it started so now cut the tail of the previous colour to a similar length and tie the 2 together. This places any joining knots tidily on the edge of the weave.
d) Locking in the edges
In this case the left edge from which the weft was fed will have established a locked in edge. This means it won't unravel when it is lifted from the loom. However the other 3 sides are not yet locked.
There are 2 are ways of securing the edges.
The first is to use a "casting off" stitch as you would in knitting. Pass the hook through the loop on the 1st pin and pick up the loop on the 2nd pin. Draw the second loop back through the first loop. Now with the second loop on the hook pass it through the 3rd loop and draw it back through the second etc etc till you've picked up all the loops on the frame. This will create more tension in the weave thereby creating more shrinkage when it is lifted.
The second is to pass a length of yarn through every loop on the pins and on completion just tie the ends together. This will give a softer edge, create less tension and thereby less shrinkage on lifting the weave.
I'd suggest doing 2 identical weaves and finishing 1 with a casting off stitch and the other with a locking yarn then comparing the 2.
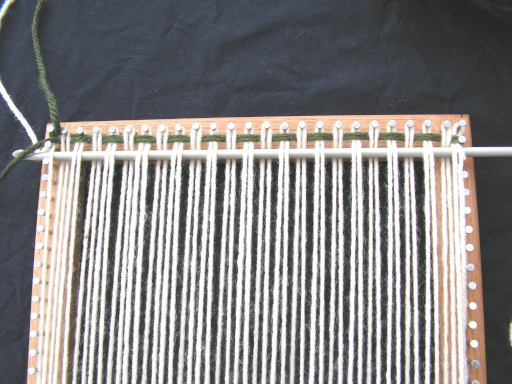
Warp 2 - approximately a 7mm weave using a DK yarn (even though the pins are 10mm apart) - less if using a Chunky yarn.
This is almost identical in it's setup and technique excepting the loom is turned 45 degrees and warping starts at the middle left pin.
However where we had 25 pins on the top row of this 9" loom when set square on, we now have 50. The vertical and horizontal space between all pins was 10mm, now it is 7mm. Overall the density is almost twice what it was before and will consume more yarn accordingly. Also each pin will have both a warp and a weft loop on it so both need picking up when locking the edges.
Tie on to the middle left pin and warp up as before.


Turn the loom 90 degrees and again tie on to the middle left pin.


Out of interest I used the warp from the first weave to apply the weft here. As you can see it's only covered about 60% of the frame proving that a weave like this does consume more yarn.
All other techniques mentioned above apply here to.
Warp 3 - a true 10mm weave - it will always be a 10mm warp no matter what yarn you use.
Easy and economical to set up. Best suited to chunkier yarns.
Tie on top left pin as in warp 1 above down to bottom left pin and up to pin 1 again. What we will do here is keep the warp threads to 1 side only of each pin unlike weaves 1 & 2 above.


When meeting the pin go clockwise round one and anticlockwise round the next one on the top or bottom row. The reverse applies at the other row.
Warp 4 - a true 7mm weave
Pretty much the same as warp 3 to set up but set on the bias.
Tie on middle left pin as in warp 2. Again we're keeping the warp threads to 1 side only of each pin unlike weaves 1 & 2 above.
When meeting the pin go clockwise round one and anticlockwise round the next one on the top or bottom row. The reverse applies at the opposite end of that particular warp strand.
Above all learn to play with your loom. Wind on yarn, create a seemingly crazy warp then see if you can weave with all or part of it then take the workable elements and design something really special.


Warp 5 - the continuous weave
This one is totally different to any of the above. Rather than a double strand weave which we've been doing this one is a clever single strand creating warps and wefts simultaneously as you do with a Tri Loom.
This one is woven with a DK yarn so you can better see how the weave develops. I'd normally use a Chunky yarn for this.
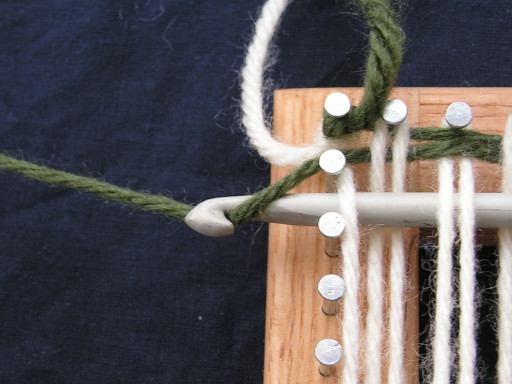
Tie on to the left middle pin, take the yarn over to and round the middle right pin and back to the underside of the left pin looping round it and up to the next pin. Now there are 2 weft strands in place the weave can begin. With the yarn you just took upwards from pin 1 set across pins 2 and 3, take the hook between the 2 wefts and hook the yarn drawing it down to hook over pin 2 on the bottom row.


Now with the yarn on pin 2 hook the right hand side of it and draw it over to pin 2 on the right side. The yarn will always be feeding from the top side of the weave.


Go round the same pin on the top row and back to the same one on the left.


Go up to the next pin above, hook it and draw it down as before


Just keep on weaving and watch the weave grow. It's a really quick and rewarding process.


Change colours at any time by leading in a few rounds of yarn before cutting the old colour from the ball. Tie knots tidily at the edge and on a pin.